Send email using Microsoft Graph with application-level permissions
Use this guide if you want to configure the WPO365 | LOGIN or WPO365 | MICROSOFT GRAPH MAILER to send WordPress emails from one of your Microsoft 365 Exchange Online / Mail enabled accounts using Microsoft Graph instead of SMTP with application-level permissions instead of delegated permissions.
Please note This guide only describes the alternative steps needed to configure application-level permissions for the plugin in Azure AD. Please click the following link for the complete guide to install and configure WPO365's Microsoft graph mail feature for WordPress.
Risks when using application-level Mail.Send permissions
This article explains how you configure the WPO365 | MICROSOFT GRAPH MAILER plugin for WordPress to send emails using Microsoft Graph with application-level permissions. There are many good reasons why you do NOT want to configure application-level Mail.Send permissions. But the most important reason would be that this permission can be used to send emails as any user from your organization.
Having said that, if you believe that
- you have done enough to protect your WordPress website from rogue users and other type of hackers and you have a use case where you need to send WordPress emails from more than one mailbox
- and you cannot - for example - resort to using a different reply-to email address instead,
then you can configure the WPO365 | MICROSOFT GRAPH MAILER plugin to send WordPress emails using Microsoft Graph with application-level permissions, as explained below.
Before you start
- You are a Global Administrator for your company’s Microsoft 365 tenant / Azure AD directory or have at least sufficient privileges to register a new application in Azure Active Directory.
- You are an Administrator for your WordPress website.
- If you already registered an application (created an App registration) in Azure AD for your WordPress website (e.g. to enable Microsoft based Single Sign-on or Azure AD User synchronization using any of the WPO365 features), then you can skip Step 1 below.
Step 1 - App registration
- In Azure Portal click the 'hamburger' (icon with three horizontal lines in the upper corner) to open the menu.
- Navigate to Azure Active Directory > App registrations.
- Click + New registration.
- On the Register an application page appears, enter your application’s registration information.
- Name Enter a meaningful application name that will be displayed to users of the app.
- Supported account types Select Accounts in this organizational directory only
- Redirect URI Leave empty
- Click Register to create the App registration in Azure AD.

Step 2 - API Permissions
- Click API permissions from your App registration's menu on the left.
- Click + Add permission.
- Select Microsoft Graph > Application permissions.
- Scroll down to Mail and check
- Mail.Send
- If you need to send attachments larger than 3 MB from WordPress (this is a premium feature and requires the WPO365 | MAIL extension), then the plugin must be able to create a draft email before sending it and you must additionally check
- Mail.ReadWrite
- If you need to send WordPress emails from a Microsoft 365 Shared Mailbox (this is a premium feature and requires the WPO365 | MAIL extension), then you do not need to add further permissions.
- Click Add permissions.

-
Wait until Grant admin consent for … has become available, then click to grant consent for all users in your tenant to use this ‘App registration’.
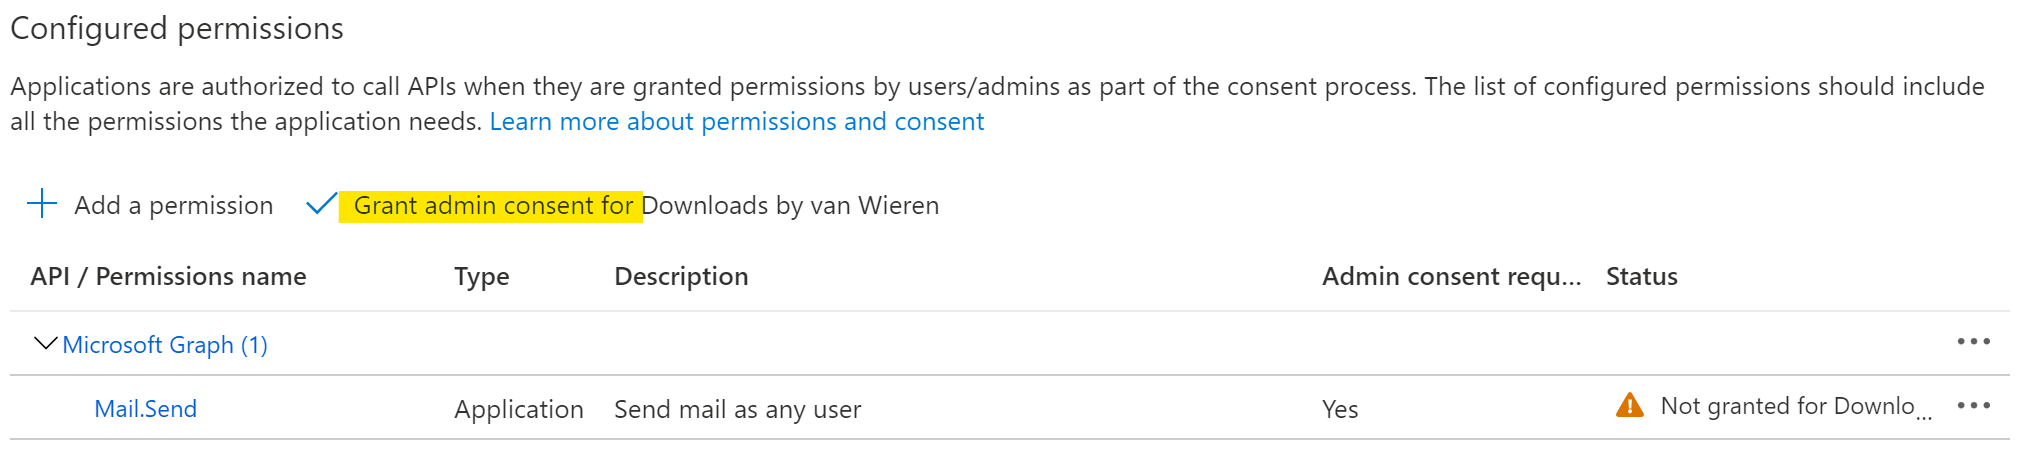
At this point you must be aware of the fact that you have now granted an application identity the unlimited permission to send emails as any user in your organization and ensure that you have taken sufficient precautions to protect your website against attacks
Also note that if you use this App registration for the sole purpose of sending WordPress emails, then you can remove the User.Read delegated permission.
Step 3 - Certificates & Secrets
Perform the following steps to create an application client secret.
- Click Certificates & Secrets from the App registration menu on the left.

- Click + New client secret.
- Optionally you can give the new secret a Description that helps you remember it later and choose an expiry date e.g. 6 Months *.

- Copy the secret's Value (not its ID) ** and temporarily paste it in a text file. You won’t be able to retrieve it later.
* Once a secret is expired the plugin will fail to retrieve tokens. Therefore, you must renew this password right before it expires and update the plugin's configuration accordingly (see next step).
** Make sure to copy the value and not the Secret ID. You wouldn't be the first!
Step 4 - Update the plugin's Azure AD registration
Perform the following steps to configure the Azure AD registration for the WPO365 plugin.
Please note When you plan to exclusively use application-level permissions, you do not need to configure the Redirect URI.
- Go to WP Admin > WPO365 > Mail. Every time this page loads, it will check whether the plugin has already been configured either with delegated or with application-level permissions. The plugin's Mail configuration page will become editable as soon as the check is completed.
- To complete the mail authorization configuration, you must now supply the Directory (tenant) ID, Application (client) ID and an Application (client) secret of the App registration that you created in the previous step. You will find the Directory (tenant) ID and Application (client) ID on the App registration's Overview page. The Application (client) secret you should have saved temporarily in a text file.

- As soon as you filled out all three fields Directory (tenant) ID, Application (client) ID and Application (client) secret, you will notice that the plugin starts to search for an existing mail authorization configuration, because of the spinner to right of the Authorize button (the Refresh button to right of the Authorization status field allows you to manually start this search). The plugin should be able to detect that you have reconfigured application-level permissions for the App registration and as a result the Authorization status should show that Application-level permissions have been detected, as shown below.

Please note The plugin supports sending WordPress emails using delegated permissions and this is the recommended configuration. Therefore, the plugin will show a warning and recommends that you remove the application-level permissions and instead configure delegated permissions. But obviously, if you have good reasons to configure application-level permissions that you can safely ignore the recommendation.
Please note Since you configured application-level permissions you should NOT click the Authorize button. However, if you do, you'll see a notice that you should not click it if you're configuring the plugin to use application-level permissions and you can click to cancel the mail authorization flow.
Remove application-level permissions
Perform the following steps if you want to remove application-level permissions for sending WordPress emails using Microsoft Graph.
- Navigate to your App registration in Azure AD e.g. by click the link View in Azure Portal for the Application (client) ID field on the plugin's Mail configuration page.
- Continue to the API Permissions page.
- From the list, delete the application type permission for Mail.Send.
- Grant consent as an administrator and confirm that you would like to remove the permissions that you just deleted altogether.
- Return to the plugin's Mail configuration page and click the Refresh button to the right of the Authorization status field.
Troubleshooting
If the test email was not sent successfully, then you may check the plugin's debug-log for any errors. Please perform the following steps to collect debug information:
- Navigate to WP Admin > WPO365 > ... > Debug and check Enable debug.
- Reproduce the error.
- Navigate back to the Debug tab as soon as possible thereafter, click Download as JSON and send it to our support team (in a separate file attachment).

You can reach the WPO365 team for support and questions in one of the following ways:
- Click the Contact link at the top of this page.
- Use the Beacon by clicking the question mark in the blue dot on the plugin's configuration page.
- Fill out the Contact Form on the website.