SSO | SAML 2.0 - Automatic configuration
Preview notice
We are working hard on a new WPO365 tutorials site and we are very happy to invite you to visit instead the tutorial to configure SAML 2.0 based single sign-on.
Starting with WPO365 v25.0 the recommended approach to configure SAML 2.0 based SSO is an automatic one that involves the generation, export and import of metadata XML files. However, if you wish to manually configure SAML 2.0 based SSO then please use the following (now deprecated) guide https://docs.wpo365.com/article/207-saml-2-0-manual-configuration.
Use this guide if you want to configure the SAML based single sign-on capability of the WordPress + Microsoft Office 365 / Azure AD plugin.
Before you start
- You have reviewed the installation prerequisites and have installed and activated the plugin (see Getting started - Installation).
- You are a Global Administrator for your company’s Office 365 tenant / Azure AD directory (or have at least the ability to register a new Enterprise Application).
- You are an Administrator for your WordPress website.
- Your website uses SSL and the internet address starts with https://.
OpenID Connect "versus" SAML 2.0
There are many differences between the OpenID Connect and SAML 2.0 based single sign-on (see https://docs.microsoft.com/en-us/azure/active-directory/develop/authentication-vs-authorization for details). One important difference is the fact that SAML is only for authentication whereas OpenID Connect can be used to authenticate a user and to get authorization to access Microsoft 365 services such as Microsoft Graph, SharePoint or Power BI in one request.
|
Please note When you configure SAML 2.0 based single sign-on, the plugin cannot get delegated access on behalf of the logged-in user for Microsoft 365 services. This means that the Microsoft 365 Apps that ship as part of the plugin e.g. for Power BI, Content by Search (SharePoint Online), Documents (SharePoint Online / OneDrive) and Employee Directory (Microsoft Graph) can not be used. Other premium features e.g. roles + access, custom user fields, avatar and user synchronization can still be used, since they can be configured to use application-level permission. |
Enterprise Application
- In Microsoft Entra Portal expand the 'Identity' menu.
- Navigate to Applications > Enterprise applications.
- Click + New application.
- Click Create your own application.
- Enter a name that helps you remember what application you are currently registering e.g. 'WordPress Internet SAML | Production'.
- Select the option that you want to Integrate any other application you don't find in the gallery.
- Click Create to create the new Enterprise application and wait until the Overview page automatically appears.

- From the Overview page, continue to the Properties page.
- Scroll down to Assignment required? and select No.

|
Please note If you require (user) assignment then make sure to assign users on the Enterprise application's Users and groups page, or else no one will be able to sign in with this application. |
- Continue to the Enterprise application's Single sign-on page.
- Select SAML to continue.

Service Provider Configuration - Upload metadata file
The Basic SAML Configuration section defines the so-called Service Provider (SP) that wants to connect to the Identity Provider (IdP) so it can benefit from single sign-on. In this case your WordPress website is that Service Provider and it wants to connect to Azure Active Directory Identity Provider.
Perform the following steps to automatically configure the SAML Service Provider (SP) portion of the Enterprise application.
- Leave the Enterprise application that you created and configured open in one browser tab.
- Start a new browser tab and navigate to WP Admin > WPO365 > Single sign-on.
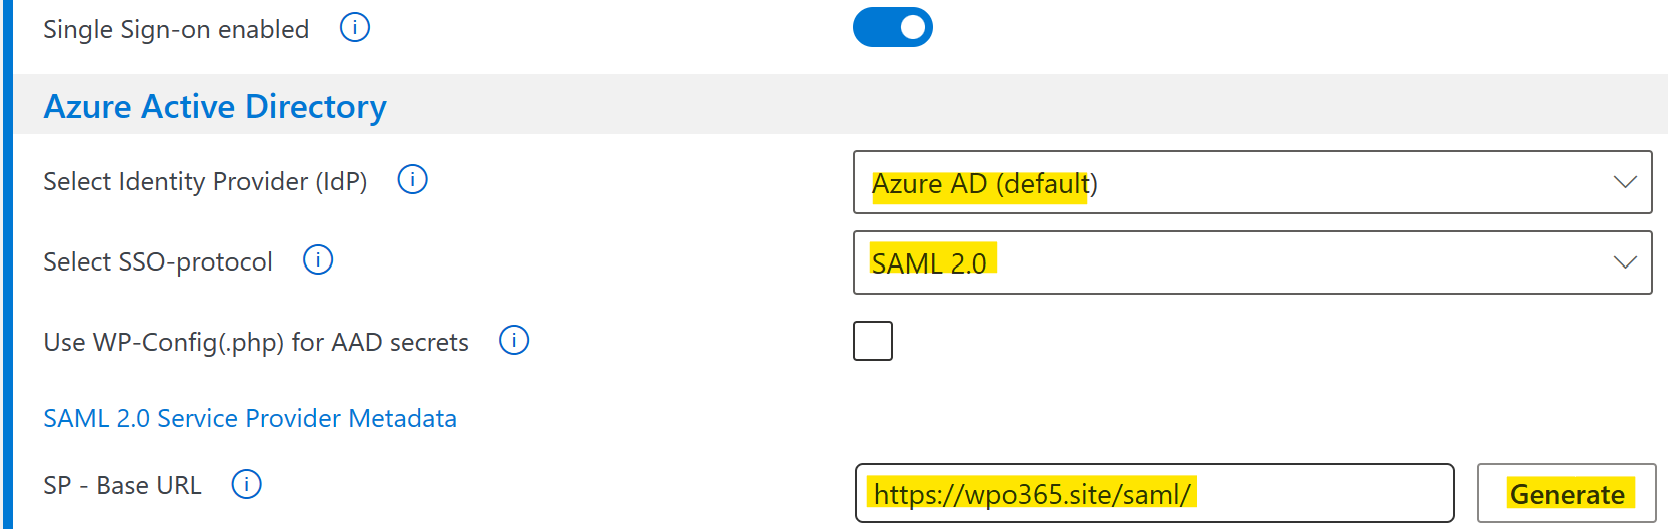
- If not yet enabled, then toggle Single Sign-on enabled.
- Select Azure AD (default) as the Identity Provider (IdP).
- Select SAML 2.0 as the SSO-Protocol.
- Check whether the proposed SP - Base URL corresponds to your WordPress website's home address URL.
|
Please note The address https://wpo365.site/saml/ used throughout this guide is an example and in your case the URL will be a different one. |
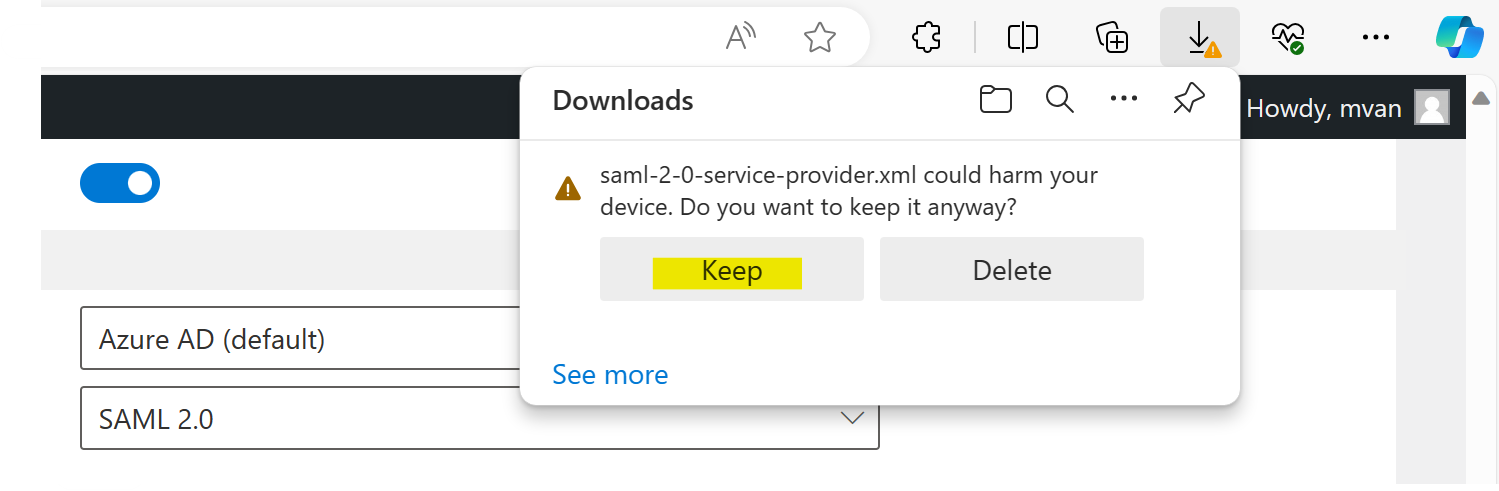
- Now click to Generate the Service Provider metadata. Your browser will start the download of an XML file. If asked whether you want to keep or delete the file, select Keep and Save the file to your local computer.
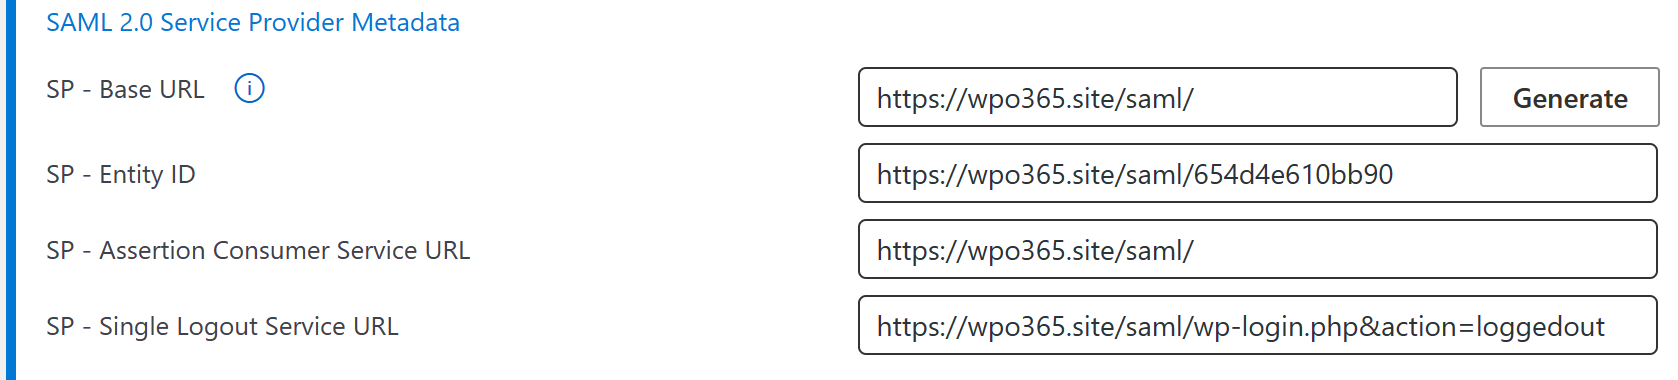
- At the same time all fields in the section SAML 2.0 Service Provider Metadata have been generated with their proposed values.
|
Please note You can update any of the generated values as you see fit. Just make sure to generate a new Service Provider metadata file and replace any older version. |
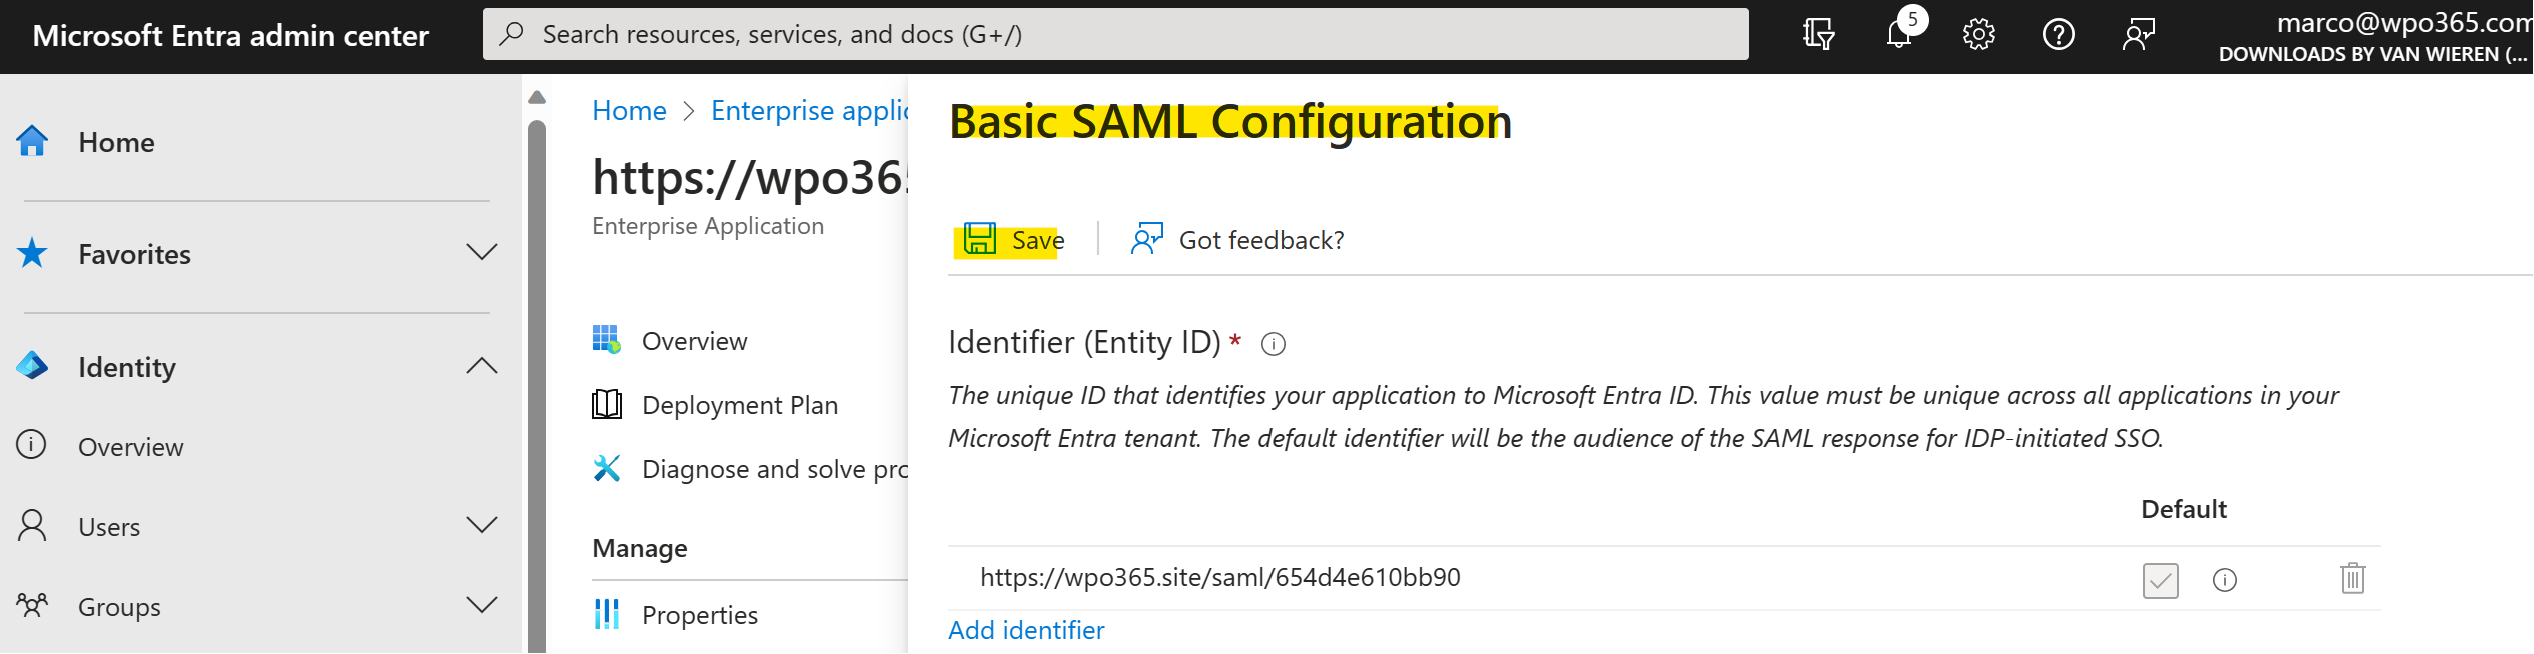
- Switch back to the browser tab with the Enterprise application still open.

- Click Upload metadata file, select the XML file that you generated in the previous step and finally upload it. A panel will open showing the Basic SAML Configuration.
- Click Save to keep it.
- Finally click X to close the panel.
Identity Provider Configuration - Import app federation metadata
Perform the following steps to automatically configure the SAML Identity Provider portion of the Enterprise application.
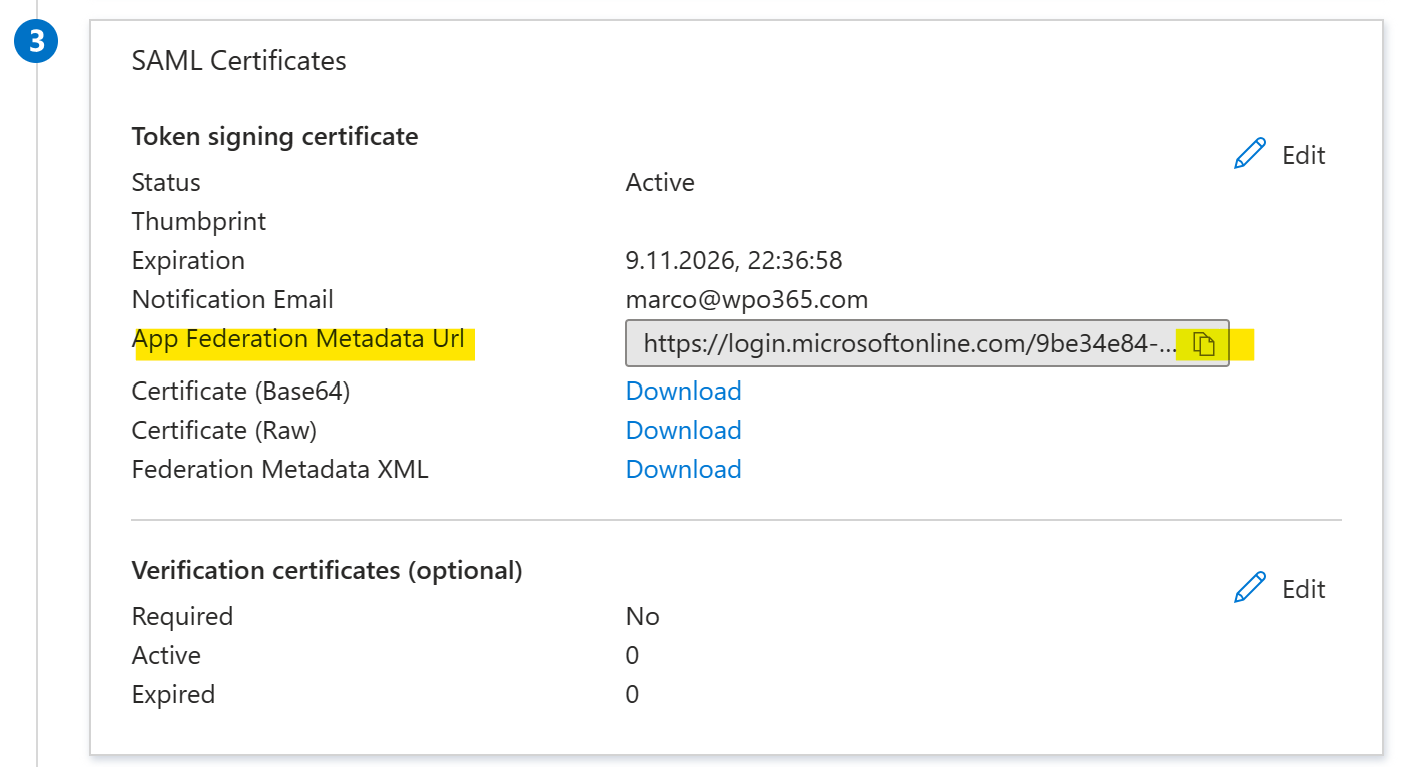
- Scroll down to the SAML Certificates section of the Enterprise application.
- Copy App Federation Metadata URL using the designated button.
- Switch to the tab with the plugin's Single Sign-on configuration page still open.
- Scroll down to the section SAML 2.0 IdP Metadata and paste the App Federation Metadata URL in the corresponding field.
- Click Import.
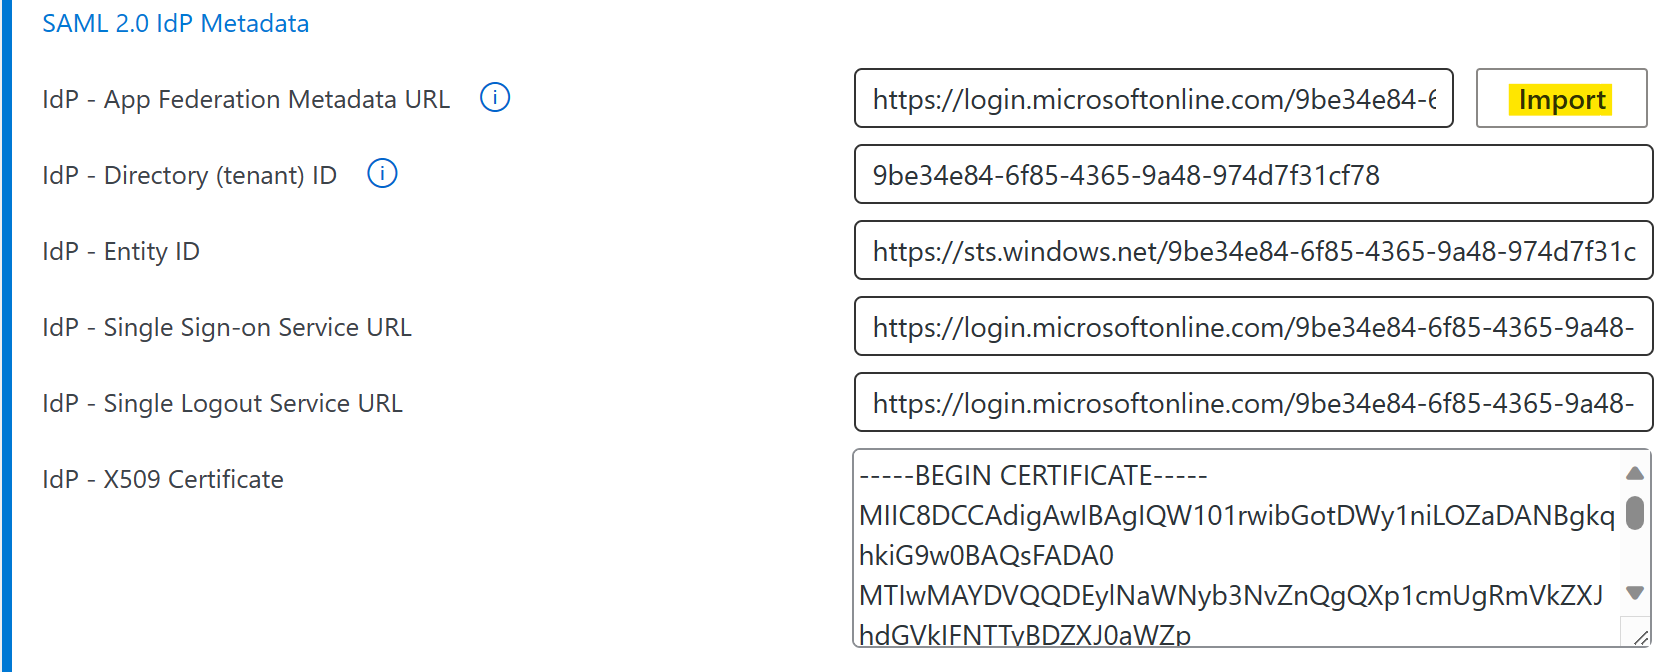
- Ensure that all fields in the section SAML 2.0 IdP Metadata are populated including the X509 certificate.
- Scroll down to the page and click Save configuration.
Test the configuration
Perform the following steps to self-test the plugin.
- Go to the plugin's Plugin self-test page.

|
Please note As soon as the self-test is starting, the "Test mode" will be activated. During this time the plugin is not protecting your website. The plugin will now try and sign in using Microsoft and you may be prompted by Microsoft to sign in. Also note Please be aware that at no time your authentication input will be shared with (y)our website and / or the plugin: All information you enter is only shared with Microsoft at all times! The plugin has many premium features that are not enabled by default and that can only be enabled if you have purchased one of the premium extensions or bundles. The Plugin self-test will show test cases for those features as failed when no extension or bundle was found capable of enabling the features. |
- The Plugin self-test will automatically load. Click Start self-test, sign in with an Azure AD user (that optionally must have been assigned to the Enterprise application, depending on your configuration) and ensure that at least the first 3 test have been passed successfully.

Tip: User Attributes & Claims
Mapping (custom) claims to WordPress user profile fields is a premium feature that requires one of the following addons / bundles CUSTOM USER FIELDS, LOGIN+, SYNC or INTRANET.
For instructions on how to configure this synchronization of Azure AD user profile attributes to WordPress, please check this guide.
Tip: Single Sign-out
See https://docs.wpo365.com/article/90-single-sign-out for more information on support for single sign-out, which is supported by the LOGIN+, SYNC and INTRANET editions of the plugin.
Tip: Advanced settings
Since version 11.14 of the plugin it is possible to configure advanced settings for the (OneLogin) SAML 2.0 library (see https://github.com/onelogin/php-saml for an example of such settings). This may be needed if you need to allow for multiple authentication options when users receive - for example - the following error Authentication method 'WindowsIntegrated' by which the user authenticated with the service doesn't match requested authentication method 'Password, ProtectedTransport'.
Advanced settings need to be added as a PHP constant to your wp-config.php file. The following example illustrates how you can add support for the WindowsIntegrated authentication method.
define( 'WPO_SAML2_ADVANCED_SETTINGS',
    array(
        'security' => array(
            'requestedAuthnContext' => array (
                'urn:federation:authentication:windows',
                'urn:oasis:names:tc:SAML:2.0:ac:classes:Password',
                'urn:oasis:names:tc:SAML:2.0:ac:classes:PasswordProtectedTransport',
            )
        )
    )
);

/* That's all, stop editing! Happy publishing. */