WordPress user provisioning with Azure AD (SCIM)
Preview notice
We are working hard on a new WPO365 tutorials site and are excited to invite you to visit instead the tutorial on the integration of Entra User Provisioning and your WordPress.
Introduction
Use this guide if you want to configure user provisioning from Entra ID (AAD) to your WordPress website using the System for Cross-Domain Identity Management (SCIM) standard. SCIM communicates user identity data between identity providers and service providers. Microsoft is an example of an identity provider. Your WordPress website is an example of a service provider. Service providers require user identity information and an identity provider fulfills that need. To facilitate the automatic provisioning of users, WPO365 exposes a custom SCIM endpoint that connects with Entra ID (AAD). Once connected, Entra ID (AAD) will push data concerning new, updated and (soft) deleted (assigned) users to this endpoint. WPO365 processes the incoming data and updates WordPress user profiles accordingly.
|
Please note Even though SCIM does also supports the (de-)provisioning of groups, the WPO365 implementation of a custom SCIM endpoint does not. Instead you can assign WordPress users to roles based on their Azure AD group memberships (see https://docs.wpo365.com/article/39-map-between-azure-ad-groups-and-wordpress-roles for details). |
Before you start
- Make sure that your Entra ID license allows you to provision users automatically to SaaS apps. See Microsoft's Entra Plans & Pricing Overview for details.
- You are a Global Administrator for your company’s Entra ID tenant and that you have sufficient privileges to register a new non-gallery application in the Entra App Gallery catalog (= Enterprise Applications).
- You are an Administrator for your WordPress website and can make changes to the WordPress configuration file wp-config.php.
Prepare your WordPress website for Entra ID (AAD) User Provisioning (SCIM)
- Go to WP Admin > WPO365 > User sync.
- To create a new Secret Token, click the Generate button. The token is required for the next step of configuring the Admin Credentials in Entra ID. Please note that you can also enter your own token. The method of adding a token to the system through the globally defined constant WPO_SCIM_TOKEN in your wp-config.php has been deprecated.
- Toggle Enable user provisioning (SCIM) to ensure that WPO365 is ready to connect with Entra ID.
- Decide what should happen if a user is deleted in Entra ID (AAD)
|
Please note By default, when a user is deleted in Entra ID, the user is initially soft-deleted. A user will be permanently deleted from Entra ID (AAD) only after 30 days. When you connect WordPress via SCIM with Entra ID (AAD), this means that a user is first deactivated* in WordPress before they are permanently deleted. When a user is deleted from WordPress, you have the option to reassign any posts they have created to another user. To configure, input a user's username into the text field and click the Check User button. When a user is successfully identified, their username and user ID are displayed in blue text beneath the text field. Alternatively, you may opt for soft-deleting users, which means that the user is deactivated*. It should be noted that if Entra ID (AAD) provisions a soft-deleted user again, their WordPress account will be reactivated. * Deactivated The user will be retained within WordPress forever, but their roles will be removed. WPO365 will also prevent any attempts by the user to sign in using local WordPress credentials. |
- Scroll down and select SCIM as the Source for custom user fields. This will stop WPO365 from requesting user attributes from Microsoft Graph every time a user signs in with Microsoft on your WordPress website.

- Continue to scroll to the bottom and click Save configuration.
|
Please note Because you are receiving your user identities from Entra ID, there is no need for WPO365 to attempt to update user details each time a user signs in on your WordPress website. Therefore you can speed up the user-authentication by checking the Express login option.
|
You will need to ensure that Entra ID is able to access your WordPress REST API or else it cannot push SCIM compliant messages to the custom SCIM endpoint provided by the plugin.
- Please make sure that you disable any plugins that may block access to the WordPress REST API and double check your firewall configuration.
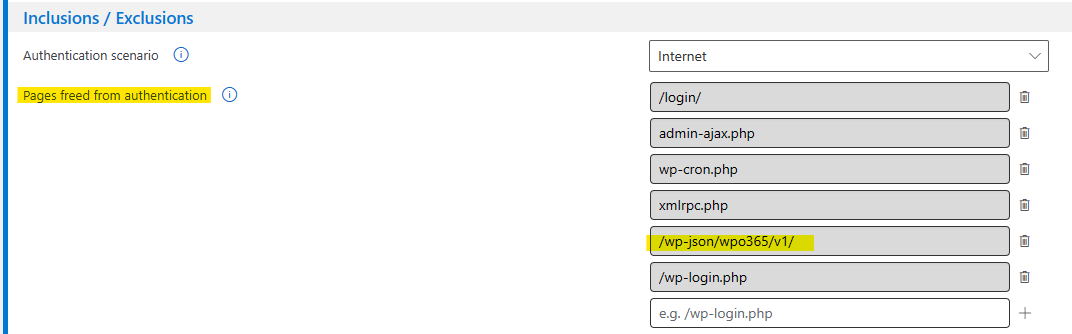
- Navigate to WP Admin > WPO365 > Single Sign-on and add /wp-json/wpo365/v1 to the list of Pages freed from authentication. Make sure to click + to add the new line.
- Scroll to the bottom of the page and click Save configuration.
Connect Entra ID to your WordPress website
- Sign in to Entra Portal and if needed, switch to the correct tenant / directory. To switch directories, activate your personal profile menu located in the right upper corner of the portal and click Switch directories.
- From the portal's main menu, select Identity > Applications > Enterprise applications. A list of all configured applications will show, including apps that were added from the gallery.
- Click + New application > Create your own application.
- Enter your own name for the new application, select Integrate any other application you don't find in the gallery (Non-gallery) and finally click Create. The new app is added to the list of enterprise applications and opens to its Overview screen.

Please note "https://www.wpo365connect.com/ | TUTORIAL" is an exemplary name for the application and must be replaced by your own name.
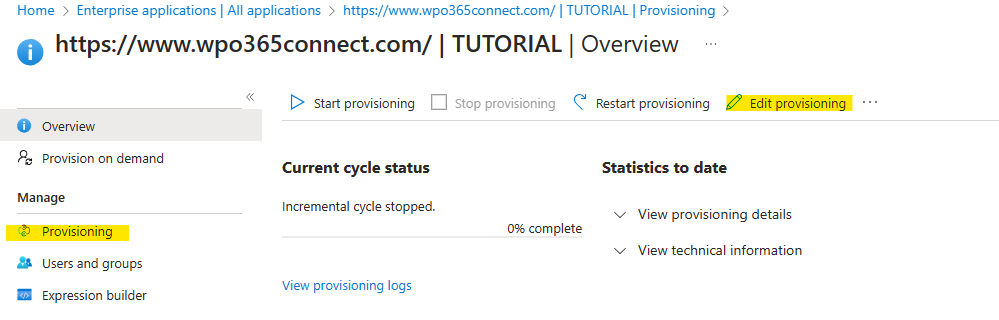
- Continue by selecting Provisioning.

- On the Provisioning page, click again Provisioning under Manage.
- From the Provisioning Mode dropdown, select Automatic.
- As Tenant URL enter your website's home URL and append the path /wp-json/wpo365/v1/ to it e.g. https://www.wpo365connect.com/wp-json/wpo365/v1/.
- Now copy the Admin Credentials > Secret Token that you generated (or entered) during the previous step and paste it as Secret Token.
- Click Test Connection.
- If the connection is tested successfully, click Save.

Please note www.wpo365connect.com is an exemplary home URL and must be replaced by your website's home URL.
|
Troubleshoot Customers have encountered various issues in the past with getting the connection to work as expected. The two most common issues are:
|
Configure mandatory user attribute mappings
Mappings allow you to define how data should flow between Microsoft Entra ID (AAD) and the Enterprise Application that you have created in the previous step and that represents your WordPress website (referred to as customappsso) in Entra ID (AAD).
Mappings exist for Users and for Groups. Since WPO365 does currently not support the provisioning of Groups, you must disable this group of mappings.
- From the Enterprise Application Overview page, either click Edit provisioning or Provisioning.
- Click to expand the Mappings section and click Provision Microsoft Entra ID Groups.
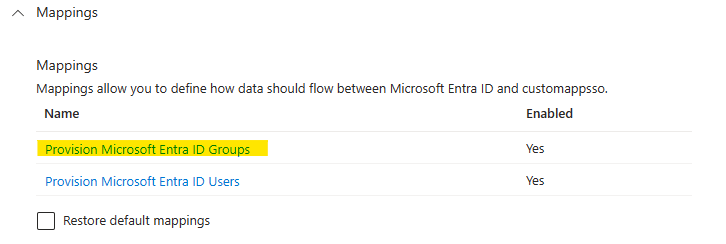
- Continue and toggle No for the Enabled setting.
- Click Save and return to the Provisioning page.

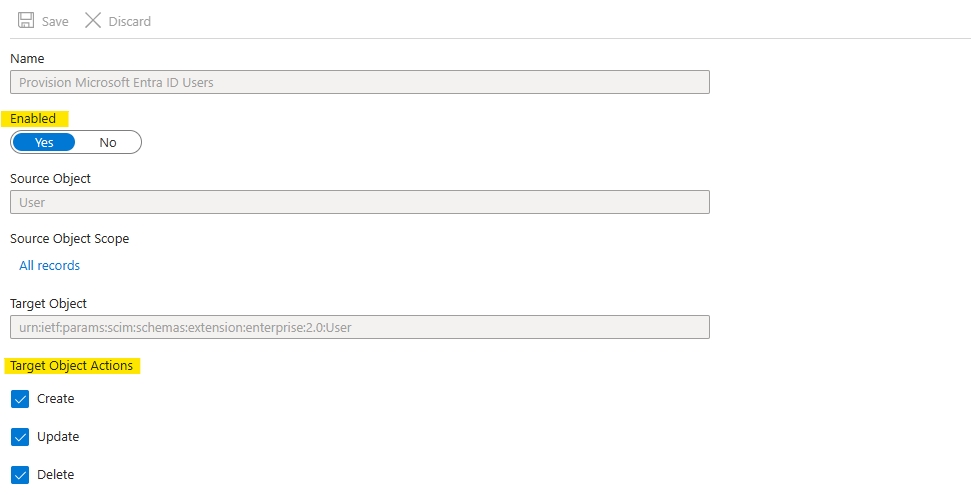
- To edit the Attribute Mappings for Entra ID Users, click the Provision Microsoft ID Users link.
- Ensure that Enabled is Yes and review the Target Object Actions and adjust them as necessary.
- Examine the list with Attribute Mappings and ensure that the following mappings exist; Otherwise, WPO365 will not work as expected.
| customappsso Attribute | Microsoft Entra ID Attribute |
| userName | userPrincipalName |
| active | Switch([IsSoftDeleted], , "False", "True", "True", "False")
|
| emails[type eq "work"].value | mail
|
| name.givenName | givenName
|
| name.familyName | surname
|
| name.formatted
|
Join(" ", [givenName], [surname])
|
WPO365 works best, if it also receives the user's Entra ID (AAD) Object ID. However, this attribute is not mapped by default. Perform the following steps to add a custom mapping.
Add a custom mapping for objectId
- Scroll to the bottom of the list with the Attribute Mappings and check the option Show advanced options.
- Click the link to Edit attribute list for customappsso to add a new attribute.
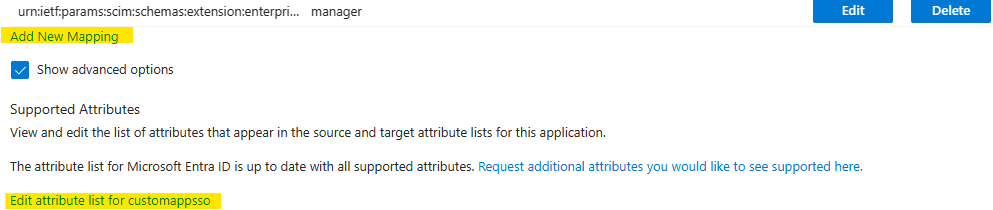
- On the Edit Attribute List screen, scroll to the bottom of the list and add a new attribute with the name urn:ietf:params:scim:schemas:extension:wpo365:2.0:User:objectId and leave type as string, as depicted below.

- Scroll back to the top of the list and click Save.
- The Edit Attribute List screen will close automatically and you are back at the Provisioning page.
- Click Add New Mapping (see previous screenshot).
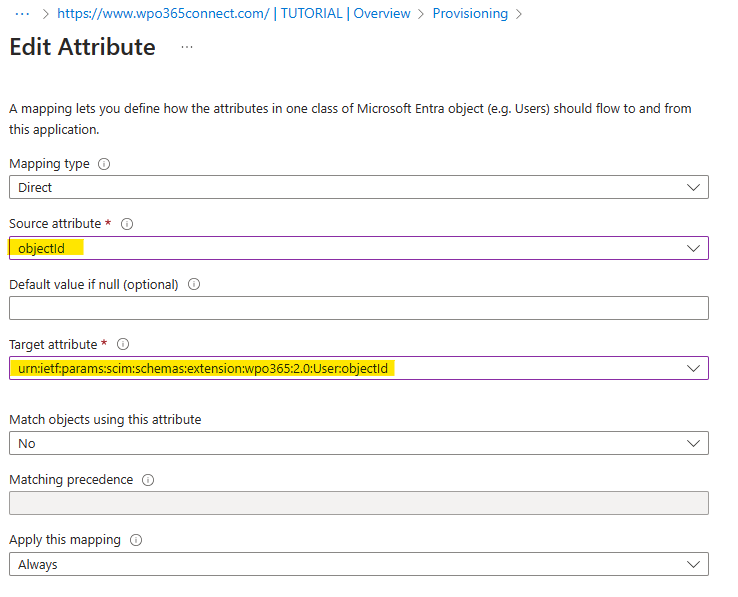
- On the Edit Attribute screen, create a new mapping with the following details:
| Option | Value |
| Mapping type | Direct (default) |
| Source attribute | Select objectId from the list |
| Default value if null | Empty (default) |
| Target attribute | Select urn:ietf:params:scim:schemas:extension:wpo365:2.0:User:objectId from the list |
| Match objects using this attribute | No (default) |
| Matching precedence | Empty (default) |
| Always apply this mapping | Always (default) |
- Scroll to the bottom of the page and click Ok to save the new mapping.
- The Edit Attribute screen will close automatically and you are back at the Provisioning page.
WPO365 now captures the user's objectId and internally stores it as user metadata under the key name aadObjectId and uses it to search for the user when they sign in with Microsoft.
Configure optional user attribute mappings
The preceding section outlined the configuration of user attribute mappings, which are essential for WPO365 to function as expected. However, you have the option to create additional user attribute mappings. Once configured, Entra ID (AAD) will transmit these attributes to WordPress, and WPO365 will then process and store them as metadata attributes within WordPress.
|
Please note Optional user attributes may be used in several ways, for example as those listed below.
|
Optional user attribute mapping for a default user attribute
Perform the following steps to create an optional user attribute mapping for the default user attribute urn:ietf:params:scim:schemas:extension:enterprise:2.0:User:department that maps to the user's department attribute in Entra ID (AAD).
- Login to WordPress Admin in a new browser tab and continue to WPO365 > User Sync.
- Scroll to the section Custom user fields (Azure AD -> WordPress) and add the following entry to the list of SCIM attribute to WordPress user meta mappings.
| Option | Value |
| SCIM attribute | scim::urn:ietf:params:scim:schemas:extension:enterprise:2.0:User:department |
| WordPress usermeta key | For example scimDepartment
will be used as the meta_key for the actual database record |
| Custom title | For example Department
will be used as the label for this item when you enable the option Show Azure AD user attributes in a WordPress user profile |
|
Please note It is recommended to prepend the prefix scim:: to ensure that WPO365 correctly identifies and sources the specific attribute within a SCIM message. |

- Scroll to the bottom of the page and click Save configuration.
Optional user attribute mapping for a new user attribute
Additionally, you can create a mapping for a new user attribute, such as jobTitle that is not mapped by default. To complete this task, simply follow the same procedures outlined in the earlier paragraph titled Add a custom mapping for objectId. After adding the mapping, simply add a new SCIM attribute to the WordPress user meta mapping as explained in the preceding paragraph.
|
Important Whenever a user attribute in Entra ID (AAD) is updated, it will want to transmit that update to all of the configured user provisioning applications. Before sending the update, it will ask the receiving application to provide its version of the user and their attributes to confirm that an update is necessary. Therefore you must make sure that there are no mappings in the Attribute Mappings list, for which you have not created a SCIM attribute to WordPress user meta mapping as explained in this section. Please note that for the mandatory mappings mentioned previously (userName, active, givenName, surName, name.formatted and urn:ietf:params:scim:schemas:extension:wpo365:2.0:User:objectId) you do not need to create a mapping in the SCIM attribute to WordPress user meta mappings, because WPO365 will always apply its internal mappings for these attributes. However, this doesn't mean that you cannot add your own mapping for any of those attributes to the SCIM attribute to WordPress user meta mappings list, if you would like to receive the value of those attributes to store them as user meta. |
Test your setup using Provision on Demand
Perform the following steps to test your setup by provisioning a user on demand.
- Go to the Enterprise Application's Overview page and click Users and groups. Make sure that you have assigned all the users and / or Entra ID (AAD) groups that should be provisioned to your website. If no users are assigned then all users will be effectively skipped by Entra ID (AAD) User provisioning.
- To add a new user or group, click + Add user/group.

- To select a user or group click None selected and search for the object that you want to add to this application.
- Click Select and then Assign to update the assignments.

- Return to the Enterprise Application's Overview page and click Provision on Demand as shown below.

- Select one of the assigned users and then click Provision.

- As soon as the provisioning completes, you can see the results as depicted below.

- Also verify in the WordPress user's list that the user has been provisioned as expected.
- As previously mentioned, Entra ID (AAD) will initially request the user from WordPress to verify if the user exists and, if so, whether any of their attributes have changed. This implies that if there are attribute mappings in Entra ID (AAD) not linked to WordPress user meta, WPO365 will not return those attributes when Entra ID (AAD) queries the user. As a result, Entra ID (AAD) may interpret this as a need to update those attributes. You can see this for yourself if you click Retry to retry the provisioning.

- The screenshot above shows that there are numerous attribute mappings in Entra ID (AAD) which are not mapped to WordPress meta, forcing Entra ID (AAD) to send updates for these attributes. Since unused mappings are causing a significant performance burden on the WordPress server, it is recommended to remove them.
- Once you have cleaned up all the mappings and attempt to provision the same user again, you should receive the result depicted below.

View SCIM messages sent by Entra's Provisioning Service
If you wish to view the (almost) raw data that Entra's SCIM based Provisioning Service has sent to your website, then you should enable WPO365 Insights. WPO365 will flatten the data it receives and you can view those messages when you go to WP Admin > WPO365 > Insights and scroll down to the Users box. Locate the SCIM Key Indicators for Users created successfully (SCIM), Users not created successfully (SCIM), Users updated successfully (SCIM) and Users not updated successfully (SCIM). Expand any of the indicators that has at least one event captured. To view the corresponding SCIM message click the View link in the Data column, as shown below.

Clicking the View link will open a modal window that displays the flattened data in the form of key-value pairs, as illustrated below.
